I'll add to this in the future when I can squeeze out a few more minutes, but for right now I think these simple pics will be of some help to quite a few that have been asking how to wire up an old marquee light.
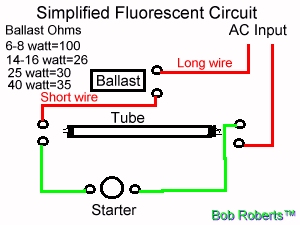 This is a simplified drawing that I did the best I could with. I'm no artist for sure! I looked in quite a few manuals for a layout similar to this, but most were poor pics or vague wiring diagrams. I hit some of the archives without any luck, so I drew my own blow-up.....yikes! I probably should have explained to my 9 year old grandson just exactly what I wanted to get better results than what I have achieved, but he is way up north in Alaska, & I'm stuck here in good old New Orleans about as far away as you can possibly be, so I guess they'll have to do :(
The list of ohms for each ballast is on the left and you should measure your's before putting a new fluorescent lamp in or else it may go poof instantaneously upon power up if it has a short.
The pic to the left is of an unmodified Defender marquee fluorescent assembly....I had to dig deep into the warehouse to find one that had not yet been modified. These were fitted with a 15" fluorescent tube from the factory deviating from the standard 18" tubes that are available almost everywhere & in most all games. In the early years I had made up a wood paneling template with the 2 sets of holes in it that were marked as to left or right & that you simply placed in each corner to mark the new holes needed to move the bi-pin sockets apart to accept an 18" tube. I subsequently learned that someone was making peel & stick templates very similar to accomplish the same thing.
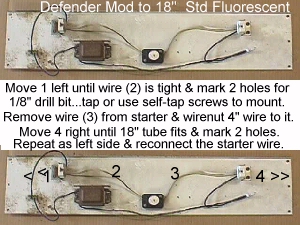
I always drilled the 1/8" holes & then used a tap to thread them to use the screws that are already present. Quite possibly the screws may make their own threads, but if not, self tapping screws could be used if you don't own a tap & die set. If nothing else, you could drill larger holes & use bolts & nuts to secure them. If you want the tube to be exactly in the center, you'll have to lengthen both starter wires, but looking it over with the one side lengthened as in the pic, it is not that far off & does not show once the marquee is installed.
The typical 18" fixture uses a F15T8/CW 18" fluorescent tube, the F15 signifying 15 watts & the T8 signifying the type/size tube...in this case a 1" in diameter as opposed to the F14T12/CW 15" fluorescent tube at 14 watts and a T12 type which is 1½" in diameter. Ops use to ask for fat tubes or skinny tubes when ordering. These both use the FS-2 starters & the common replacement ballast that works with 13 thru 20 watt fluorescents.
As always, these ballasts, tubes & starters can be found on the parts page.
Happy Gaming...........