Date 5/30/2000
I started the process of converting an old Stargate cabinet into Metrocross (Sorry Williams Fans, but the cabinet was Free, and I'm already restoring a Stargate). The process is somewhat time consuming as the stripper I bought (BIX) is some of the weakest stuff around. I bought the weak stuff on purpose to try to get at the side art on my Stargate cab to see if I could save the side art. For the most part, it worked great. However, there were some spots that were over done and thus the need to redo the entire paint job. (See my Stargate Restoration for more information on that) I am kind of torn as to whether or not to keep up the stripping on the Stargate or to use the new Moon Patrol cabinet that I got that has the same problem (Converted to some stupid game and painted all black). Both my Stargate cabinets are in excellent shape (as is the Moon Patrol). I had planed on cutting the Cabinet to match the shape of the Moon Patrol/Joust/Robotron style of cabinet for Metrocross, this might make my life easier :-) Up to this point I have been preparing the Stargate cabinet to be transformed, however, this is probably going to change the more I think about it.
|
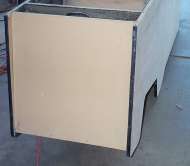
The Back
Date 5/30/2000
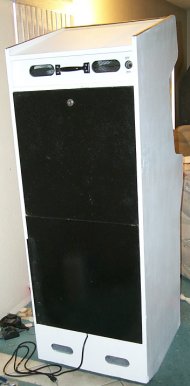 Looks prety cool with the black doors on it now :-) Off to the game room! Looks prety cool with the black doors on it now :-) Off to the game room!
|
Keeping the Front In
Date 5/30/2000
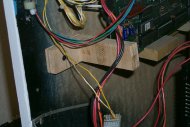 Took two pieces Nailed them together to form an "L" then used a screw to fasten it to the side of the game. Took two pieces Nailed them together to form an "L" then used a screw to fasten it to the side of the game.
Keeps the PCB nice and snug.
|
Keep the PBC in place
Date 5/30/2000
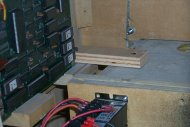 I used a couple scrap pieces of wood to hold the PCB in place. I used a couple scrap pieces of wood to hold the PCB in place.
This is VERY important! The last thing you want is your PCB to go flying around when you move the game.
|
Now the Left Side
Date 5/30/2000
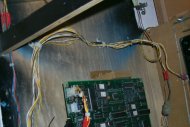 Route the wires away from the PCB so that you can get easy access to the PCB. Route the wires away from the PCB so that you can get easy access to the PCB.
Be sure to leave enough slack so that you can easily unplug or plug in the PCB.
|
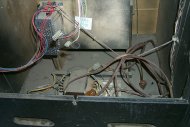
Now Monitor Wires
Date 5/30/2000
 Most of this is cosmetic, but thats an important part as well. Most of this is cosmetic, but thats an important part as well.
|
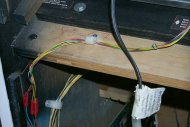
Route Your Wires
Date 5/30/2000
 Use the Plastic Clips to hold the wires up. Use the Plastic Clips to hold the wires up.
This makes it look better and less likely that something will get snagged on anything as you move the machine around.
|
Controls Wired Up
Date 5/30/2000
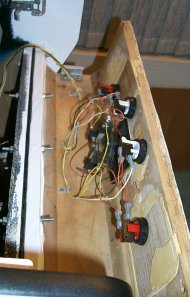 All better! All better!
Now everything (except the Joystick) has quick disconnects. If you take a look at the picture, you will notice that the wires are connected to the wrong positions on the Micro-Switches. They should be on the top connector and the middle connector. After I fixed that, everything worked just fine.
|
Controls
Date 5/30/2000
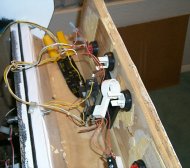 The wiring harness that I had used Leaf Switches for the buttons and the shorter buttons. The wiring harness that I had used Leaf Switches for the buttons and the shorter buttons.
I changed to micro switches and longer buttons because it was easier to work with. In order to use the existing harness, I needed to rewire all the controls up.
|
Control Panel
Date 5/30/2000
 The control panel is finally done. The control panel is finally done.
I'm not 100% happy with the results, but its not bad. I picked up stuff called "Magic Covering" which is a little better than wall paper, but no where near a good vinyl overlay. The stuff comes in 18" long rolls for about $5, so its hard to go wrong. The main problem with it is that it tears and stretches easily. However, if you are looking for a CHEAP alternative, this is one.
|
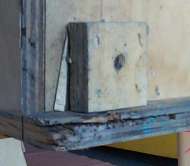
Magic Sliders
Date 5/30/2000
Well, I bought these things called "Magic Sliders" from Home Depot and decided to give them a shot. Well, I miscalculated a few things and it didn't turn out all that well :-(
Problem Number one, is I didn't measure the distance from the bottom of the cabinet to the bottom of the sides. I assumed that 1 1/2" blocks would be tall enough, but as it turns out, they should have been 1 3/4" to be truly effective.
Why? Well, its mostly due to the carpet. The purpose of having leg levelers or in this case "Magic Sliders" on the bottom of the game is to protect the bottom edges of the game. If you ever looked at the bottom of a game and the edges are all chewed up, well thats because leg levelers were not used propery.
If you want to protect your game while you move it around, you NEED to have leg levelers or something similar.
What I did was take two blocks of 3/4" plywood and screwed them together with 1" dry wall screws (I prefer these because they bite into the wood really well). I then put glue on the side with two screws and then screw the block onto the bottom of the cabinet in the 4 corners with 2" dry wall screws.
Once those are screwed in, I then apply the "Magic Sliders" to the bottom of the blocks.
A couple of things I learned in this exercise.
Always Double Check your measurements
Magic Sliders works better on Hard Surfaces rather than softer surfaces.
Check this Stuff BEFORE applying the glue
So Learn from my mistakes...
|
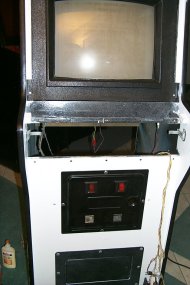
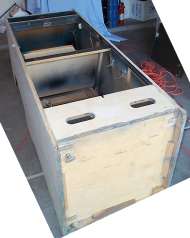
We Need More Power!
Date 5/30/2000
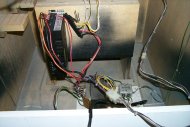 I like the place where the power supply is mounted, I think it fits quite well in this cabinet. I like the place where the power supply is mounted, I think it fits quite well in this cabinet.
Its easy to get to and its not in the way. I spliced the AC input and Ground into the existing power harness after the filter block. The only issue with this, is that the power switch and interlocks do not affect the switching power supply. The do affect the Monitor and Marquee light though.
|
Clean ME!
Date 5/30/2000
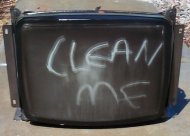 Can you say "Filthy!" I thought you could! Can you say "Filthy!" I thought you could!
I took this one out in the yard and hosed it down! Once you hose this down, be sure to let it completly dry. Also, you should discharge the monitor BEFORE you attempt to do this. As always, use extream caution when dealing with High Voltage.
|
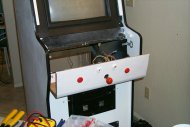
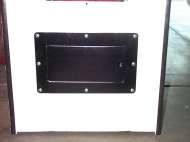
Why risk cutting?
Date 5/30/2000
 Rather than risk damaging the maquee (longer distance to cut going width wise), I decided that I could just put in a 1/4" piece of wood which would allow the metal plate to sit level and be secured to the cab. Rather than risk damaging the maquee (longer distance to cut going width wise), I decided that I could just put in a 1/4" piece of wood which would allow the metal plate to sit level and be secured to the cab.
Home depot sells 1/4"x2"x26" pieces of wood that work perfectly. I just had to cut it down to 23" and it was ready to go!.
|
Marquee, Trials and Tribulations
Date 5/30/2000
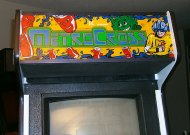 Well, I picked up an NOS marquee on eBay the other week so I decided to cut the used one down to fit my cabinet. Well, I picked up an NOS marquee on eBay the other week so I decided to cut the used one down to fit my cabinet.
I took it down to Al since he has a tool that is designed to cut plexi. Cut it down and it was still a hair too wide. So I had to break out the dremel and sand the edge down (Not much! Just enough to squeeze it into the cab).
|
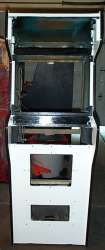
Assembly has begun!
Date 5/30/2000
 I've started assembling the game now. I've started assembling the game now.
Its shaping up pretty well if you ask me! Check out the pictures and see for yourself.
|
Date 5/30/2000
I Sanded the sides of the game with 220 Grit sand paper using my Finishing sander. The sides are very smooth now. I started re-assembling everything and was testing the isolation transfomer since I didn't know if it was any good or not. I found that the transfomer is currently putting out 130VAC from the terminals that feed the Monitor. I am looking into whether or not 130VAC is too high for the monitor. My assumption at this point is that it is too high and I'm going to need a new Transformer. My understanding is that most monitors use 115 - 120 VAC, and the Nintendo monitors (Sanyo 20EZ) only use 100 VAC. As soon as I find an answer, I'll let you know here. If you have the answer then please @EMAIL@ me :-) I replaced the power cord on the Transformer, lets hope that wasn't in vain. My second Metrocross Marquee should be here soon, so when that arrives I can cut the one I have down to the right size to fit in the cabinet.
|
Finished Painting!
Date 5/30/2000
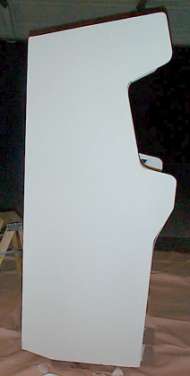
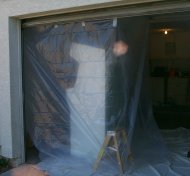 Ok, the paint job is now offically done! Ok, the paint job is now offically done!
Bought more paint and finshed the other side. Even with the makeshift painting booth, paint was flying around a little too much this time. I am going to have to figure out a better way to contain the paint.
|
Paint Gun is a Success!
Date 5/30/2000
I used my Paint gun today to redo the paint job (actually it was a touch up since I didn't remove any of the existing paint). Man, it looks soooo much better than the rolled on paint its not even funny! I could only do one side since I ran out of paint. However, from what is done so far, it looks like its going to be excellent.
|
Enough is Enough!
Date 5/30/2000
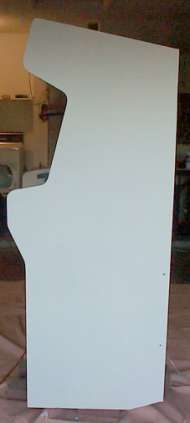
You reach the point when you decide that enough is enough and anymore tinkering will just make it worse. Well that's the conclusion that I came to when painting the cabinet. After screwing around with the paint job, I came to the realization that I wasn't going to get it much better than it currently is so I said "You're DONE!".
The paint was rolled on using a foam roller which left it a little bumpy, I then bought one of those expensive brushes and learned a lesson. What lesson? Well, no matter how good the equipment, if you suck at doing something, the good equipment is only going to make sucky work cost more :-). Don't get me wrong, better equipment can help A LOT, but only if you get good with it. Crap is still crap. So we'll just say I need some work on my painting skills and we'll leave it at that :-). I wanted to sand the sides down so they were smooth because I didn't want to have to apply side art to a rough and bumpy surface. I used my finishing sander and 150 grit sand paper. 20 mins later both sides were nice and smooth. The only draw back is if you look at the cabinet closely, you can see minor sanding patterns. I probably could have prevented this by using 200 grit sand paper.
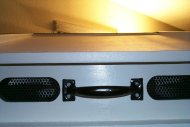
As you can see in this picture, I have already applied the Trim. For those of you who read my guide, you'll notice that I said that the Trim should be the LAST thing you put on. Well, in most cases, yes that is true. However, I wanted to see what it looked like, so I put it on :-) Remember, its just a "Guide" its not the law . After putting the trim on, I put the lower coin door on. Before that I repainted it with Hi-Glossy black spray paint. Makes it look new! I also used brand new shiny bolts! I was thinking of painting them black, but I kind of like the silver on the black. Below you can see where I put the light fixture and the speaker assembly back in. The cabinet is really starting to take shape and looks great! 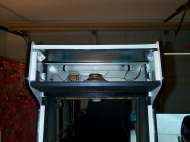
I picked up the control panel, turned around and attempted to put it on. *CLUNK!*, hmmm.... that's Odd, *CLUNK!*. Ok, this is very odd! As it turns out, the control panel I got is about 1 1/4" too wide for the Moon Patrol cabinet! ACK! My assumptions that my Metrocross had lived in another Moon Patrol were just shot to hell. Well, now what? Well, I have another control panel that DOES fit the cabinet, but I'm going to have to do some MAJOR work on that since its cut to hell (like the Metrocross Control Panel). Either that or I can attempt to cut the Metrocross control panel down. Not an easy task. A few minutes pass by and it dawns on me that if the control panel is too wide, I bet the Marquee is too wide! Damn! It is. So now I have to cut that down to size. These are not insurmountable problems, but its not something I want to do to rare parts! Its not every day that you see a Metrocross ANYTHING. So I must use caution when making adjustments of this nature. Stay tuned!
|
Today was a good day for Metrocross!
Date 5/30/2000
When I did the first corner I had used a guide, but I found that the guide was getting in the way and it was just as easy to do it free hand. If you look in the picture you can see where I marked out the lines I used as a guide to cutting the corner.
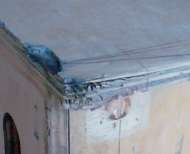  
As you can see by the above pictures, trying to patch the corners with putty would be a futile effort as they would likely be damaged again in the future because the corner would be a lot weaker.
I started out by cutting the bottom corners off the back of the cabinet due to the amount of damage they had. After that was done, I sanded the edges smooth. Looks really nice. The cabinet is still nice and sturdy and it tips back easier now when loading on the hand truck. Its also less likely to break in the future.
   If you look closely, you'll see that its night time out in the "Primered" picture :-) Actually, I started working on it at around 6pm and finished around 8pm. I wasn't rushing anything and probably could have done it all in about an hour. The hard part was the front because of the tight corners and the other pieces of wood in the way. The wood that is in the way is the wood that supports the Marquee, Front Glass, and the Control Panel. The Digital camera doesn't do it justice. I'm very happy with the results so far, and I think its going to look really cool once I replace the black trim. If you look at the bottom of the cabinet, you should also see several bricks. I used these bricks to raise the cabinet off the ground so I could primer the sides easier without primering the ground.
|
All Wired up and No place to go!
Date 5/30/2000
Metrocross has been wired up and ready to install into the cabinet when I'm done painting it. Painting should be done next weekend. Its amazing that when I plugged it in and turned it on, it was EXACTLY like I remembered it. I even remembered several of the patterns which is scary! That was way back in 1985 - 86 when I played it!
|
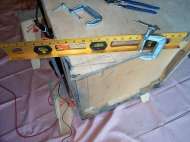
Date 5/30/2000
The top and the back have now been fully stripped with the exception of the area on the back where the handle is. I will do that and the front next weekend. Here are the pictures of the top and back.
|
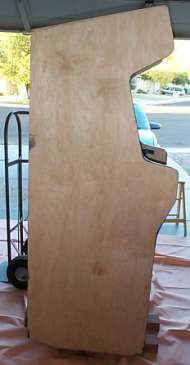
Date 5/30/2000
The left and right sides have now been fully stripped. For not having paint on the sides, it looks pretty cool! I will be painting the sides a glossy White, but haven't decided on what to paint the front and back. I'm thinking that the front and back should be Black. What do you think? All white or should white sides, black front and back, or white sides, white front, and black back? Drop me an @EMAIL@ and let me know what you think.
|
Date 5/30/2000
Ok, its been decided. The converted Moon Patrol is getting converted to Metrocross, I'll probably restore both Stargates. I started on the stripping and its a lot of work! 5 hours later, and one can of 32 oz stripper and I'm done with one side. The pictures from 4/3/1999 on this page have been moved to the Picture Tutorial on Stripping Cabinets.
|