The Ugly Mess
Date 4/28/2002
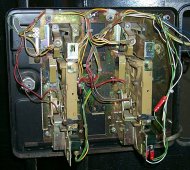
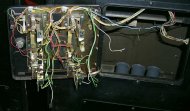 Ever get a game and the coin door is a total mess? Well, that's the way I got my Make Trax. Wires all over the place, bare wires exposed, and a mix and match of patch work. Ever get a game and the coin door is a total mess? Well, that's the way I got my Make Trax. Wires all over the place, bare wires exposed, and a mix and match of patch work. The first step is going to be evaluating the situation and identifing what goes where. In this case, the green wires are ground and the white wires are the coin select lines.
|
Connectors
Date 4/28/2002
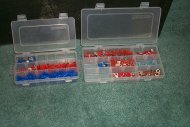 I get most of my connectors at a place here in Phoenix called Apache Reclamation down by Al's place (actually the buildings behind his warehouse). I buy the connectors in bulk and put them in my storage boxes that I picked up at Home Depot for situations just like this. I get most of my connectors at a place here in Phoenix called Apache Reclamation down by Al's place (actually the buildings behind his warehouse). I buy the connectors in bulk and put them in my storage boxes that I picked up at Home Depot for situations just like this.
|
Hack Job #1
Date 4/28/2002
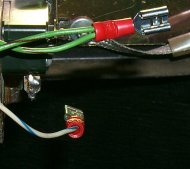
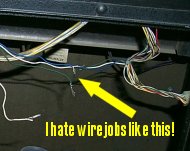 The first step here is going to be to fix the 3 wire hack job that has the three wires spliced together by simply twisting them together. I hate these type of hack jobs as the 3 wires could easily short out if they touch each other. The first step here is going to be to fix the 3 wire hack job that has the three wires spliced together by simply twisting them together. I hate these type of hack jobs as the 3 wires could easily short out if they touch each other. I separated the three wires from each other and I used the red crimp tubes to splice them back together. The blue crimp tubes are for larger gauge wires.
|
Date 4/28/2002
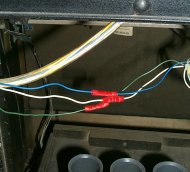 As a general rule, I always crimp the tubes on the outsides (closest to the wire) first then move towards the center. This keeps the wires from being pushed out while you crimp. As a general rule, I always crimp the tubes on the outsides (closest to the wire) first then move towards the center. This keeps the wires from being pushed out while you crimp. The crimp tubes that I have usually require about three to four crimp spots to get the job done. This also ensures that we have good contact between the metal inside the tubes and the wires. Once the tube has been crimped, give the wires a light tug to make sure they won't come out. If they come out, you get to start over again and do it until they are good and snug. We don't want wires falling out and shorting out on something.
|
Bent Switches
Date 4/28/2002
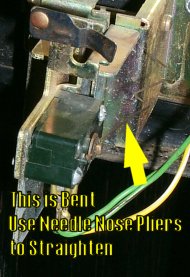 The next easy task to take care of, is a bent switch. These can be a pain to fix sometimes depending on how mangled the wire is. If you're lucky, it won't be mangled that much and you can fix it in a matter of seconds. The next easy task to take care of, is a bent switch. These can be a pain to fix sometimes depending on how mangled the wire is. If you're lucky, it won't be mangled that much and you can fix it in a matter of seconds. In this case, I was lucky.
|
Date 4/28/2002
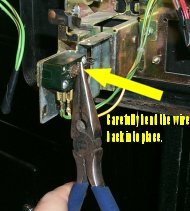 Normally the wire should be at 0 degrees and not 45. In order to fix this, we break out the needlenose pliers and very carefully bend the wire back to where it should be. You don't need to use a lot of force and it make take a couple of attempts to get it just right. Normally the wire should be at 0 degrees and not 45. In order to fix this, we break out the needlenose pliers and very carefully bend the wire back to where it should be. You don't need to use a lot of force and it make take a couple of attempts to get it just right. You should bend it fairly close to where its attached to the switch for best results. Bending it further out towards the end will prevent it from operating as smoothly and possibly cause it to bind up.
|
Broken Wires
Date 4/28/2002
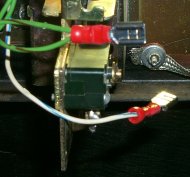
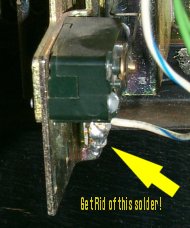 The other switch had the wires soldered on which is not how it originally came from the factory. If you look at the previous pictures you'll see that they were attached via quick disconnects. The other switch had the wires soldered on which is not how it originally came from the factory. If you look at the previous pictures you'll see that they were attached via quick disconnects. This step required me to break out the soldering iron to remove the excess solder from the switch. In this case only one of the wires was broken off, but I wanted them to be consistent, so I removed both.
|
Date 4/28/2002
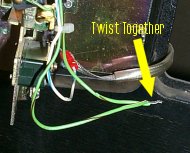 The back of the switch had two green wires attached to it, so I had to twist the two wires together to put them in the connector. The back of the switch had two green wires attached to it, so I had to twist the two wires together to put them in the connector.
Again, start by crimping closest to the wire and then moving towards the middle.
|
Crimp the Outside
Date 4/28/2002
 Start on the outside, work your way towards the middle. Start on the outside, work your way towards the middle.
|
Date 4/28/2002
 So it should now look like this. This picutre is a little blurry as the camera was trying to focus on something else, but hopefully you should get the idea. So it should now look like this. This picutre is a little blurry as the camera was trying to focus on something else, but hopefully you should get the idea. Once the connector is crimped on, you can attach them to the posts on the switch. Notice that the Solder hasn't been removed yet, I did that after I crimped the wires.
|
Extra Wires
Date 4/28/2002
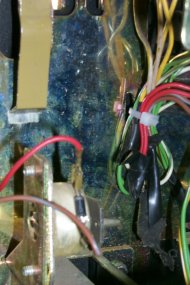 You may notice a bunch of extra wires hanging around. These are for the third coin slot that was not installed on the coin door. This particular coin door allows for three coin slots, however, it was only configured for two from the factory. You may notice a bunch of extra wires hanging around. These are for the third coin slot that was not installed on the coin door. This particular coin door allows for three coin slots, however, it was only configured for two from the factory. Since we are not going to be using the third coin slot, we want to zip tie the extra wires out of the way. The connectors on the end of the wires should also be covered with electrical tape in order to avoid them shorting out on anything. There is a small ring (for lack of a better word) that you can zip tie to on the back of the control panel. Gather all the wires up and zip tie them to this so they are out of the way.
|
Ta Da!
Date 4/28/2002
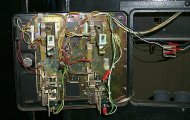 We now have a nice clean wiring job on the coin door! We now have a nice clean wiring job on the coin door!
|
The finishing touches...
Date 4/28/2002
 The only thing left to do now is install coin mechs and replace the bulbs if they are burnt out. The only thing left to do now is install coin mechs and replace the bulbs if they are burnt out. This looks so much better and will give you a lot less problems. You may want to go back and clean up any extra wire that has been spliced in or is broken in some fashion. If you look in this picture you can see where I took out the extra spliced in wire that was on the green grounding wire going to the switch on the right.
|