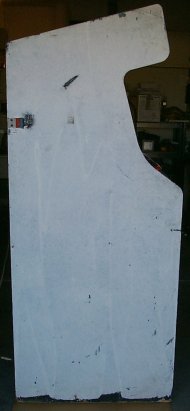
Here is what we start with...
Date 10/28/2004
 Well, this is like most games I've picked up for restoration. The sides have been painted, usally black, but in this case they used a White paint. Well, this is like most games I've picked up for restoration. The sides have been painted, usally black, but in this case they used a White paint. The problem is, how do we remove the top paint and get to the art underneath? Well, using a chemical stripper usually results in a considerable amount of damage to the original art. I read about someone using a Heat Gun to heat the paint and scrape it off. This worked pretty well and you can see the results on my Joust restoraiton page. While this technique works a lot better than the Chemical method, it still did more damage to the original art than I cared for. I'm restoring this Robotron for my friend Dave in exchange for a Zoo Keeper cabinet. Dave was over here helping doing the restoration when we discovered this technique.
|
Started with the Old Method
Date 10/28/2004
 We started using the same technique I used for my Joust. Heat the paint up, and use a scraper to scrape the paint off in stripes. This works, but as you can see, it leaves scrape marks and some of the original art gets damaged more often then not. We started using the same technique I used for my Joust. Heat the paint up, and use a scraper to scrape the paint off in stripes. This works, but as you can see, it leaves scrape marks and some of the original art gets damaged more often then not. We continued to do this for most the top half of the game when we noticed something strange. I was heating up an area getting ready to strip it, when Dave started picking at a small area that we had missed. We noticed that the paint was peeling off.
|
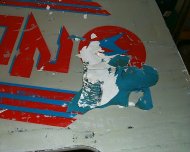
Experiment Time!
Date 10/28/2004
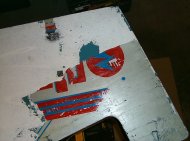
 After seeing that, we decided to do an experiment. Since the side was going to be stripped and repainted due to the damage done already, we figured, there was nothing to lose. After seeing that, we decided to do an experiment. Since the side was going to be stripped and repainted due to the damage done already, we figured, there was nothing to lose. We theorized that we heat the paint up to the point where it bubbles up we could just peel the paint right off! So we tried it. As you can see from the picture, the paint bubbles up nicely.
|
Now Start Peeling
Date 10/28/2004
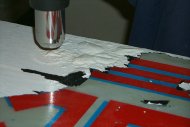
 Now Dave starts to Peel. As you can see it comes off like dead skin! Now Dave starts to Peel. As you can see it comes off like dead skin! When the paint bubbles up, it separates itself from original art. You have to find the appropriate time to start peeling the paint. If you peel it while it's still too warm, it will rip appart more often. If you wait until it's too cool, it sticks back to the original art and becomes brittle. As you can see, as he is peeling the paint off, the art underneath is in damn near perfect condition!
|
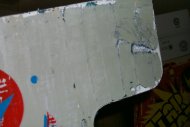
Paint "Skin"
Date 10/28/2004
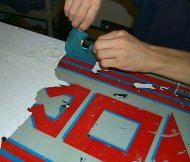
 Here is what you should have once you've peeled the paint off. The bigger the chunks the better. If you have small chunks left on the side that won't peel off, it could mean that the original art was damaged in that spot or you didn't heat that area enough. Here is what you should have once you've peeled the paint off. The bigger the chunks the better. If you have small chunks left on the side that won't peel off, it could mean that the original art was damaged in that spot or you didn't heat that area enough. You should avoid going back and reheating small areas as the heat will damage the original art. If the area is smaller than the width of the heat gun, then you may have to find an alternate way of heating up that area or scrapping the paint off with something else.
|
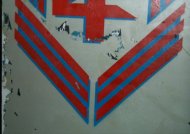
Old Method...
Date 10/28/2004
 As you can see, the old method worked, but it damaged the original art a lot. As you can see, the old method worked, but it damaged the original art a lot.
A lot less than chemical strippers would, but still, the less damage we do, the better off we are.
|
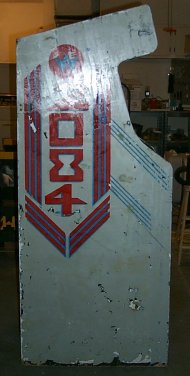
New Method
Date 10/28/2004
 The new method works MUCH better. A lot less damage and is actually easier to do. The new method works MUCH better. A lot less damage and is actually easier to do. Notice the lack of Scrape Marks?
|
Recap
Date 10/28/2004
What we found is that if you work in small sections at a time you'll get the best results. Start by heating up a small section until the paint bubbles up. The bigger the bubbles the better as that means it will come off in bigger chunks. If you heat it up too much you'll scorch the art underneath! Let the section cool down for a few seconds then start peeling. Try not to leave any slivers while it's warmer or they will be harder to remove. If you find an area that won't bubble up, it's probably because the original art was damaged and the paint bonded to the wood. If this happens, there probably isn't much you'll be able to do. This generally happens where the art was scratched or dinged. I found that to make bigger bubbles, it was sometimes easier to make a bunch of smaller bubbles and then "connect" them by heatting around them. It's also a good idea not to heat up the same area too much as it will scorch the original art. Peel towards the edges of the cabinet that way if it stops peeling it will be away from the majority of the art and you can remove it later without worring about doing too much damage. Moving the heat gun back and fourth in a slow waving motion (holding the gun perpendicular to the game) works best. Leaving it over one spot is not generally recommended.
|
Conclusion
Date 10/28/2004
 Well, this is by far the best technique I've seen to date. This technique works because they used Latex paint to paint over the top of the art (Typical House Paint). Had they used an Oil Based paint, the chances of this working drop significantly. Well, this is by far the best technique I've seen to date. This technique works because they used Latex paint to paint over the top of the art (Typical House Paint). Had they used an Oil Based paint, the chances of this working drop significantly. This works with games that had art PAINTED on the sides. Games that had stickers probably won't work as well since the heat would probably melt the sitckers. I don't have any games to test this on, so I don't know for sure. If someone tries it, let me know how it turned out. We'll do the other side of the game and probably put up a picture of an entire side done with this technique and any other tips we might discover. The art is far form Perfect, but you might be able to clean it up enough to the point where you can put it in the game room. There is still a lot of work to do after the fact since there will be a residue left from the paint and there will be several spots that you couldn't peel up at first. Enjoy!
|