Date 3/27/2000
You just bought an old converted game and you want to restore it to its original glory, the only problem is that someone decided to paint it all black. Sound familiar? 90% of the games I get are like that. I am currently restoring a Robotron and Stargate (2 of these) that have this problem. Stargate was converted to Arkanoid, and Robotron was converted to CHELNOV:Atomic Runner. This tutorial is designed to help you strip ALL the paint off including the original art work under the black paint. Why? you ask. Well, hopefully you have a set of stencils that you can use to repaint the sides with. If not, well.... Maybe you shouldn't be following this tutorial :-)
|
Date 3/27/2000
Before you go and start stripping the sides of the cabinet you should remove EVERYTHING from the cabinet as the Stripper can do NASTY things to control panels, monitors, power supplies, etc... Be sure you remember how it all goes back together! If you don't plan on doing the front or back of the machine I would HIGHLY recommend that you tape it off with good painters tape. Put some stripper on some of the tape (on just a piece of tape don't do it AFTER you taped up the game) to test it to make sure its going to protect the front and back. Also make sure the tape you get wont lift off any of the paint under it as this is just as bad.
|
Step 1
Date 3/27/2000
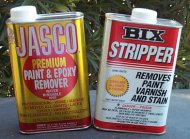 The first thing you want to do is choose a stripper that will suit your needs. The first thing you want to do is choose a stripper that will suit your needs.
I started with BIX stripper, but it smells. I then tried Jasco and it works faster than BIX, doesn't smell, but it costs about $2 more a can.
|
Step 2
Date 3/27/2000
 Get yourself a couple of Saw Horses as it makes like a lot easier when stripping. Get yourself a couple of Saw Horses as it makes like a lot easier when stripping.
You should note that the saw horses may scratch the side of the cabinet that is resting on them. Once its up on the horses, its time to start stripping!
|
Important Note!
Date 3/27/2000
 Once you get all the black paint off, you end up with a pile of goop! Once you get all the black paint off, you end up with a pile of goop!
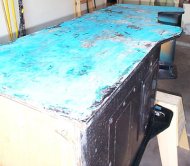
I use a piece of cardboard that I put under the end of the game. I use the Putty Knife to scrape the paint off the game and onto the cardboard. This stuff not only looks nasty, it is. You should always be wearing good gloves, eye protection, and some sort of breathing mask. I use painters masks. You should do this in a WELL VENTILATED area as this stuff stinks and its not good for your health to breath a lot. Read the warnings on the can. If you are wondering why its RED and not BLUE its because the goop picture is from one of my Stargates
|
Step 3
Date 3/27/2000
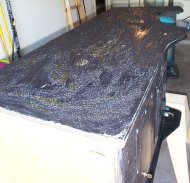 Its time to put on the first coat of stripper. Its time to put on the first coat of stripper.
You want to try to put it on as thick as possible and as even as possible. The BIX stuff takes a little while before it starts bubbling the paint, where as the Jasco stuff will start to bubble almost as soon as you apply it. Follow the directions on the can. Typically you should only have to wait about 10 to 15 minutes before you can start scrapping. Remember to scrape it on the cardboard! As you can see in the picture, the paint will bubble. When its bubbly, then its ready to be scraped off. While you are waiting, its a good time to get in a good game of Gorf, thats what I do while I'm waiting!
|
Step 4
Date 3/27/2000
 More than likely you will have to do 2 coats of stripper, so far in the two times I have done it, its taken me 3 coats and that is with both brands of stripper. More than likely you will have to do 2 coats of stripper, so far in the two times I have done it, its taken me 3 coats and that is with both brands of stripper.
This is what it looks like after the first coat has been scrapped off. As you can see there is still alot of paint left to strip off. It is very important to remove as much paint as possible with the stripper before you start sanding. Another coat means more down time, so now its time to play Pengo :-)
|
Step 5
Date 3/27/2000
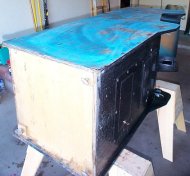
 We're getting there. We're getting there.
One more coat and we should be done. There are some stubborn parts where the black paint just wants to hang around, put it on extra thick in those spots. When you are done, you should be able to see the plywood (i.e. its white). Don't worry if you don't get 100% of the paint off as that is more work than we want to do. This should be the last time I have to wait, so while I'm waiting its time to play some Pinball.
|
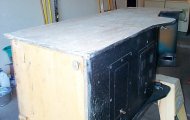
Step 6
Date 3/27/2000
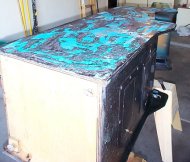
 All the black paint has been removed along with most of the blue and yellow ("Moon Patrol" was in Yellow on a blue background). After you have done this you will want to get a bucket of water, a brush and a rag. All the black paint has been removed along with most of the blue and yellow ("Moon Patrol" was in Yellow on a blue background). After you have done this you will want to get a bucket of water, a brush and a rag.
Use the brush to scrub the side of the cabinet and then use the rag to wipe it down. Once its been cleaned and dried, its time to move to the next step which is Sanding! The purpose of this is to get all the extra loose paint off and to remove any stripper still left on, we don't want that stuff flying around while we sand.
|
Step 7
Date 3/27/2000
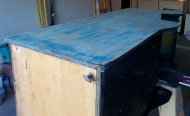 Start sanding with a Belt Sander using a 50 grit belt. Start sanding with a Belt Sander using a 50 grit belt.
I highly recommend the Makita 9910 Belt Sander as its under $100 and works very well! I have found that it works best when you sand from top to bottom. Point the sander towards either the top or bottom and move the sander in the direction of top to bottom. Sand with the 50 grit belt until you have sanded 90% of the blue paint off. Once that is done you will see something like the picture to the left.
|
Step 8
Date 3/27/2000
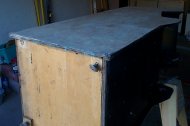 Its hard to see by this picture, but this what it should look like after using an 80 grit belt to remove all the remaining blue paint. Its hard to see by this picture, but this what it should look like after using an 80 grit belt to remove all the remaining blue paint.
What you should have left is a nice white side. Since you are using an 80 grit belt the sides will feel rough. The reason I switched to a 50 from an 80, is that the 50 can take off a lot more than I want. You can use the 50 to take all the paint off if you want, but just be careful not to gouge the sides while sanding and not to take off more than you intend to.
|
Step 9
Date 3/27/2000
 Once I have all the blue paint off and I have a nice white side its time to smooth it out. Once I have all the blue paint off and I have a nice white side its time to smooth it out.
This is where the Finishing Sander comes in. I highly recommend the Ryobi S605D Finishing Sander for this job. I use 150 grit sand paper to do the smoothing out. It usually takes 2 passes and then some spot checking to get the whole side as smooth as I want it. The picture to the left is what you should have once the cabinet has been completely sanded. You should be able to slide your hand all over the side and not feel any rough spots.
|
Date 3/27/2000
Presto! You now have ONE side stripped :-)
|
Date 3/27/2000
Now its on to the other side and optionally the front and back. One of the things I recommend that you do is to leave the T-Molding in place unless you want to reuse it. The T-Molding will get ruined by the stripper and the sanders. The reason I recommend leaving the T-molding in place is to protect the edges of the game while stripping and sanding. After its been stripped and sanded, you may want to repair any holes or broken parts and then sand those down so they are even with the rest of the side.
|
Date 3/27/2000
Well that about does it, good luck and let me know if you have any questions, comments, or corrections! Thanks.
|