The Inspection
Date 5/5/2013
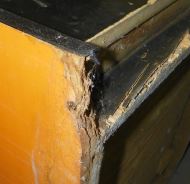
First thing to do was to inspect the game. The overall shape of the game is pretty decent except for the bottom 2" of the game which is swollen pretty badly from water damage. I'll probably have to cut the bottom off and replace it.
The side art was covered with Plexi glass, unfortunately, the person who put the plexi on, decided to screw it on with about 20 screws on each side. The good news is, is that the side art is almost fully intact. Except for where the screws are.
The game plays nicely, with a few minor graphics glitches. Probably bad sockets or dirty ROM chips, so should be easy to fix. Since I got an extra CPU board with the game, that will help as well.
Everything appears to be all original, but I'm not sure if the boards are 100% original as they don't have serial numbers on all the boards. However, I'm not concerned about that.
|
Cabinet Completely Stripped
Date 6/10/2013
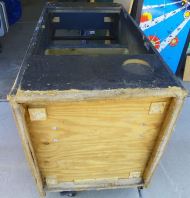
 I spent a few hours stripping the cabinet all the way down to it's shell.
I've been on the fence about building a brand new cabinet or trying to fix this one. As you can see in the picture, this one is pretty beat up, and would take a LOT of extra work to get it back to it's former self. So at this point I think I'm going to build a new cabinet and use this one as a template. I could probably salvage the cabinet, but structurally, it will never be the same.
There is an ongoing (and probably going on forever) debate about saving a cabinet, versus building a new one. I'm all about saving as many games as I can, but there comes a point where it's not worth the effort. The cabinet is only one part of a game. To me a restoration is bringing a game back to it's former glory, not necessarily 100% original. We do upgrades all the time to games when restoring. New Art, New Paint, New Metal Parts, Powder Coated parts, New Power Supplies, etc... none of these take away from the game and what it represents.
Would a 100% original game be worth more then a restored one? Depends. Is the "Original" one beat to hell and half working? Then no. If it's in good to excellent shape, then yes.
|
Changed my mind!
Date 8/10/2013
I was going to build a new cab, but I decide that the art is too complete to not try and save this cab. The art isn't perfect by any means, but it still is REALLY nice. The game plan is to replace the bottom 2" (maybe a little more to clear the bottom of the cab) of the back board, then do 4" on each side. I spent today re-arranging the garage so I could get easy access to my Table Saw and other tools. Went to Home Depot and picked up a package of dowels and a Jig for creating the holes. Wanted to do a biscuit joiner, but I don't think it would work for where I'm cutting. After the sides and back are cut and replaced, I'm going to mask off the art and the rest of cab and spray paint the sides.
|
Woodworking has begun!
Date 8/11/2013
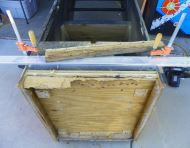
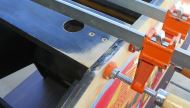
  I spent a couple hours today working on the bottom back piece. I started by figuring out where I wanted to cut it off. In this case, it was 3" from the bottom edge. That would leave me 1" between it and the air hole and I would be above the bottom panel. I wanted to make sure I was above the bottom of the cabinet so that I could use the bottom for Stability.
After taking into account the width of the blade, the guide ,etc.. I then measured the distance from the guide to the top of the back board. I then squared the bracket up from the top of the board. I figured that was going to be a lot more square then the bottom edge... In this case it was 4.5" for my guides.
  After Squaring things up, I used my Skill Saw to cut all the way across. I wasn't worried about cutting into the sides since I need to cut those off as well.
 A few minutes of hammering with a Rubber mallet upward, and the bottom piece came off, leaving some parts of it behind. Then I spent some time cleaning up what was left over. In this case it was like removing soft cardboard. I used a hammer and chissle to get as much of it off as I could, then used a Dremel with the round sanding drum to smooth it out as best I could. The cleaner the surface the better as things will lay flatter.
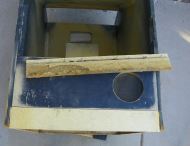  The bottom piece needed a 21/32" dado cut through it for the bottom piece and the two edges needed 1/4" dado for the side pieces. Luckily, I have a table saw with Dado blades, so it was easy to do. If you don't have a table saw, you can use a Router, just takes a lot more work... Right tool for the right job I say.
I haven't glued the board in place yet, still thinking things through to make sure I'm not going to regret it. I was going to use dowels on the edge, but due to the dado cut, those are out. My plan now is liberal use of Glue and lots of staples. I'll probably re-enforce it with blocking and brackets.
While I was under the cab, I sanded the bottom and remove the two busted blocks used for the leg levelers. I am also replacing the corroded and rusted T-Nuts used to hold the power supply in place.
|
More Cuts Made
Date 8/24/2013
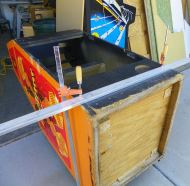
  I decided to cut all three sides before I started gluing anything back to make sure everything fit.
The biggest challenge so far has been trying to make sure that the cuts were as square as possible since I didn't really have any square edges to go off. To help, I purchased a T-Square normally used for Sheet Rock, and used the edges of the cabinet to square up the cuts. It's very close, but not 100%. Nothing a little Bondo won't hide. I'm taking my time, and trying to get the pieces cut as exact as possible. Means wasting some wood, but so far I'm happy with the results. The bottom is actually pretty stable as is, and I'm hoping that once everything is glued back in place, that it will be rock solid. All the pieces have been cut to size, and I cut one extra piece for each part just in case something goes wrong. I'm currently working on doing the dado cuts for all the sides. After that is done, I'll remove the final piece that is attached to the bottom. The left side piece is currently 99% done. I still have to cut the back (redoing this piece) and right side. Once those are all cut, I'll cut them so they all fit together then start the process of gluing everything in place. I will also be adding additional blocking to re-enforce the bottom. I have also decided to redo the leg levelers since the T-Nuts were rusted out and three of the blocks used for the T-nuts were damaged. I'll be adding new blocks plus T-Nut plates from Bob Roberts.
|
Minor setback...
Date 9/1/2013
 Well, I was finishing up the second replacement piece and part of it broke off when I was test fitting it. So at this point, I'm going to go buy some high quality ply and say to hell with the Particle board. Have never really been a fan of particle board, but figured I would try to match the original. Well, now I want something more solid.
At least I'll have templates for the new pieces so it won't have been a complete waste.
|
Gluing the bottom on.
Date 1/11/2014
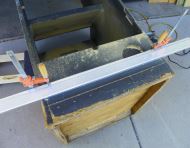
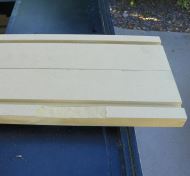
With the help from my friend Dave we glued the bottom of the cabinet on. Cutting the pieces for the bottom was an ordeal and I went through three sheets of 2'x4' ply before I was done. The first sheet was press board, which turned out to be way too soft (see pics above). The second sheet turned out to be 1/8" too thin! So it was the 3rd time and it was a charm.
The second ply was Birch and it was nice, but like I mentioned it was 1/8" too thin. So I found the right thickness in ply, but it was Oak. The problem with the Oak ply is that is splinters very easily. The Birch will splinter on you, but no where near what the Oak does. Next project I'll find Birch in the correct thickness.
|
Bottom is glued on
Date 1/18/2014
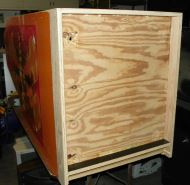
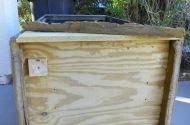
I had my doubts about how sturdy the cabinet would be after replacing the bottom 3" of it. Well, now I'm quite satisfied with the results. The bottom will probably out last the rest of the cabinet. As an additional insurance I added blocking to the bottom (not pictured here, but you can see it in pictures further down).
I used Oak Plywood for this, but I will not be using Oak again in the future. Oak has two problems:
1. It splinters easily.
2. When painted the Grain really pops out.
So with that in mind... on to the next step.
|
Cleaning off the Glue residue
Date 1/25/2014
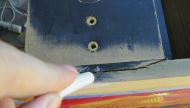
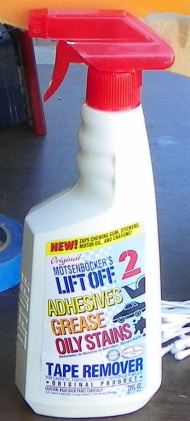 Along the edge of the artwork, there was a small strip of glue that was filled with dirt. Since I want the paint to look nice, I decided it was probably a good idea to remove the glue. In order to do that, I used a product called "Lift Off 2". Using a q-tip, a sprayed a little bit on the q-tip then used a bit of elbo grease to scrub it off. It came off pretty quickly and cleanly. Before using it, you'll want to test it on your cabinet to make sure it doesn't lift the paint. In my case it didn't matter and I don't recall that it harmed the paint.
As you can see in this picture, it works pretty well.
|
Noticed a few cracks...
Date 2/1/2014
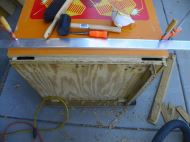
While sanding I noticed a few cracks in the back and decided to fix them. To fix them, I used a small flat bladed screw driver to pry the cracks open a bit more and then squirted Gorilla Glue in the cracks. I used a couple of Bar clamps to squeeze it back together and let it sit over night.
|
Sanded and Ready for Primer
Date 2/9/2014
Ok, bondoed and sanded everything down. I decided to go ahead and repaint the front and top of cabinet since I was doing the sides and back anyway. As I discovered later, I still needed to do a bit more prep work. 
|
Primer Coat 1 applied
Date 2/9/2014
Spent all day yesterday working on getting the garage ready to paint (had to move A LOT of stuff around). Also went over the cabinet one more time to clean it off.
Today I spent 3 hours spraying primer on the cabinet. Why so long? Well, I like to use light coats as it tends to come out better that way. It's a lot easier to add an additional pass then it is to remove excess Primer/Paint.
As always, all the defects POP when you paint the cabinet. I realized that I hadn't done enough prep work prior to painting, so now I'll have to wait for the primer to dry, sand down the defects and do a bit more filling in. Unfortunately, the camera doesn't pick up the defects very well, so it's hard for you to see. Another issue was that the Oak Ply is problematic to paint. The grain shows way too much and may require some filling to hide it. We'll find out this week.
|
Painting has begun!
Date 2/27/2014
I've applied 3 coats of Semi-Gloss Black to the front, top and back. The top is a little problematic for me since it's a little tricky to get with the gun.
Here are some Before and After shots:
|
Coat 4 of the Black Paint
Date 3/5/2014
I didn't like the way the 3rd coat looked, so I hit it with another light coat of black and I'm very happy with it now.
|
Black is now Masked off
Date 3/8/2014
Masked the Black Paint off in preparation for the painting of the sides. I taped it to the edges where the t-molding is going because I didn't want the tape sticking to the fresh paint and pulling it up. The tape is having a hard time sticking to the edge (very porous surface). Hope it is enough.
|
First Coat of Orange and it's Awesome!
Date 3/8/2014
The Color match form Home Depot is perfect. I'll post the codes later, I think I need to go back to Home Depot and get the codes again because part of the label with the numbers on them got destroyed so I cannot make them out. Hopefully they have it on file. If not I guess I could have them color match it again.
I plan on putting on two more coats. Second coat should go on tomorrow after I hit the sides with some 0000 steel wool.
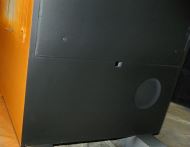
I was concerned that the replacement pieces would show through, but as you can see from the pictures above, you really can't tell. This is only the first coat too. Once I have 3 coats on there, you'll never know. My only concerns now are that I don't get any Orange paint on the Front, Back or Top and that the Art comes out fairly unscathed. Crossing fingers.
|
Argh! Over spray!
Date 3/9/2014
Well, we learned something new today.... Paint the sides first THEN the front/back/top of the cabinet. The reason is that by painting the sides first you can mask them off a lot easier and the tape is less likely to come off when you are painting. That's what happened here. I was painting the sides with the back masked off, and the paint gun caused the tape to come loose and expose the black paint. After the tape came lose the sides got some over spray on them. So now I have to mask off the sides and put another coat of black on the back.
|
Color Match Codes for Reactor Orange Paint
Date 3/13/2014
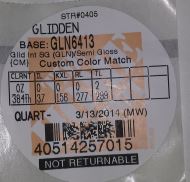 Here are the color codes I got based on matching the original paint on my Reactor. Here are the color codes I got based on matching the original paint on my Reactor.
|
Over spray fixed
Date 3/14/2014
 Fixed the over spray. I really need to clean the lense of my Camera... Now I can start on the Clear Coat. For the Clear coat I am using Minwax Polycrylic. It's the same stuff I used on RoboJuke.
|
Painting is done!
Date 3/20/2014
Yeah! The painting is done. I'm not 100% happy with the end result, but I am 98.9% happy with it, so close enough. It looks 1,000x better then when I first got it. I put two coats of the Clear on it, and removed all the masking. I'll let it dry overnight then I'll proceed on to the next step. Adding Leg Levelers.
|
Leg Levelers Attached
Date 3/21/2014
The Leg Levelers have been attached! I used two 3/4" blocks stacked on top of each other. I glued and stapled one to the bottom, then glued and stapled the second on top of the first one. I then attached the Metal Leg Leveler plates I got from Bob Roberts. I used 3 nuts on the leg levelers so they would all be the same height and would be a minimum distance from the bottom of the cabinet.
|
It's done! Yeah!
Date 3/22/2014
Well, assembly is now complete and the game is up and running! Unfortunately during the assembly, the coin door slammed into the front of the cabinet (the lower coin door...) AHHHHHHH!! So I put some touch up paint on it and will see how it turns out after it dries... I really don't want to have to paint that again, and probably won't...
|