The Cab
Date 8/13/2006
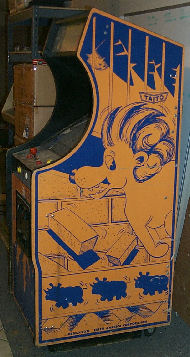 As you can see the cabinet is in pretty good shape. The base of the cabinet needs some work though. It was made from particle board and has water damage. So every time you move the cabinet, it breaks a little bit of the base off. This should be a relativly easy fix, as it's just 4 rectangular pieces of 3/4" Particle board. As you can see the cabinet is in pretty good shape. The base of the cabinet needs some work though. It was made from particle board and has water damage. So every time you move the cabinet, it breaks a little bit of the base off. This should be a relativly easy fix, as it's just 4 rectangular pieces of 3/4" Particle board. I'll pull off the old wood, build 4 new pieces and then put it back on. Should be easy right? We'll see :-)
|
Houston we have a problem!
Date 8/13/2006
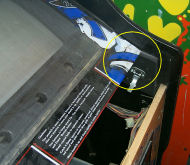 Well, Zoo Keeper was converted to Gladiator. Not a great game in the least, especially compared to Zoo Keeper. So as I go to remove the old Gladiator parts from the cab, I notice that the Bezel will not come out from the FRONT of the cabinet. Well, Zoo Keeper was converted to Gladiator. Not a great game in the least, especially compared to Zoo Keeper. So as I go to remove the old Gladiator parts from the cab, I notice that the Bezel will not come out from the FRONT of the cabinet. I thought this was a bit odd considering every other game I can think of, the bezel always comes out the front of the game. Well, as you can see in the picture, it's not going to happen. So... to remove the bezel, you actually have to do it from the BACK of the machine. Not a great design if you ask me.
|
Removing the Bezel
Date 8/13/2006
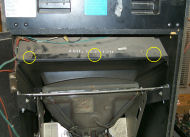 You would think that they would have made something like this easy to do. But NOOOOO... this is a major pain. You have to remove 3 screws and a bracket from the BACK of the machine to get it out. Almost every other game made has it so you can remove the bezel from the front. You would think that they would have made something like this easy to do. But NOOOOO... this is a major pain. You have to remove 3 screws and a bracket from the BACK of the machine to get it out. Almost every other game made has it so you can remove the bezel from the front. Having to get into the back of the machine makes it much harder to keep the monitor clean.
|
The Control Panel
Date 8/13/2006
 Zoo Keeper only has 4 buttons. Player 1 and 2 start, and two jump buttons. Gladiator has four additional buttons, so they had to punch in some new holes. A friend of mine who owns a Muffler shop is going to attempt to fill in the holes for me. Once that is done, I'll powder coat the control panel and put on the new REPRO overlay that I picked up. Zoo Keeper only has 4 buttons. Player 1 and 2 start, and two jump buttons. Gladiator has four additional buttons, so they had to punch in some new holes. A friend of mine who owns a Muffler shop is going to attempt to fill in the holes for me. Once that is done, I'll powder coat the control panel and put on the new REPRO overlay that I picked up. In addition to pulling off the control panel, I pulled off the Coin Door and had that Powder Coated at Glendale Powder Coating. It turned out great. You can see the coin door on the Powder Coating page. You may notice that I already had the Control Panel powder coated before I thought about having the holes filled. Should have done that in the reverse order, but no biggie since powder coating is cheap (when doing multiple parts).
|
The Overlay
Date 8/13/2006
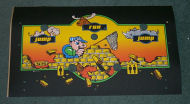 Here is the new CPO that will be applied to the control panel once it's done. Here is the new CPO that will be applied to the control panel once it's done.
I still need a Marquee and a Bezel to complete the restoration.
|
Dissassemble the Control Panel
Date 8/13/2006
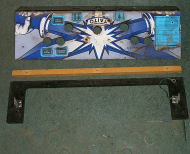 I started by dissassembling the control panel. I started by dissassembling the control panel.
There are 3 parts to it. The Metal Panel, then two braces. The wood brace is used with the hinge. The Plastic part attaches to the upper part of the control panel and has the brackets for the control panel latches.
|
Removing the Old Overlay
Date 8/13/2006
 When stripping the control panel, you want to remove as much of it as possible by hand before you break out the chemical strippers or start sand blasting. When stripping the control panel, you want to remove as much of it as possible by hand before you break out the chemical strippers or start sand blasting.
|
Time to Strip the Control Panel
Date 8/13/2006
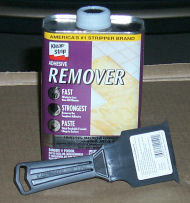 Since the game was converted to Gladiator, the control panel was modified. Extra holes were drilled and a new overlay was put on it. Since the game was converted to Gladiator, the control panel was modified. Extra holes were drilled and a new overlay was put on it. To Remove the glue left by the old overlay I tried using some Adheasive remover. It worked pretty good, but was messy as hell.
|
Getting down to the metal
Date 8/13/2006
 As you can see, this is a very messy process. As you can see, this is a very messy process.
I have been considering getting a Sand Blasting Cabinet. They are fairly inexpesnsive ($130 at Harbor Freight) and would probably make this job a lot easier.
|
Clean up on Isle 6!
Date 8/13/2006
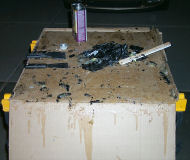 I said it's a messy process :-) I said it's a messy process :-)
|
Removing the Monitor
Date 8/13/2006
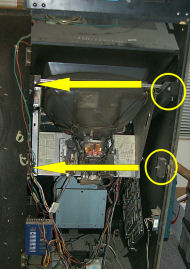 Talk about a pain! Removing the monitor from Zoo Keeper takes a bit of effort. You cannot just pull the monitor straight out the back. You have to remove the bolts and blocks of wood as circled in the picture. If you don't, the monitor frame will get snagged on them. Talk about a pain! Removing the monitor from Zoo Keeper takes a bit of effort. You cannot just pull the monitor straight out the back. You have to remove the bolts and blocks of wood as circled in the picture. If you don't, the monitor frame will get snagged on them. You don't want to remove the top bolts completely, you want them to hold the wood railings in place. You just can't have the nut and bolt sticking out on the inside.
|
Hmmm, where was that Power supply sitting again?
Date 8/13/2006
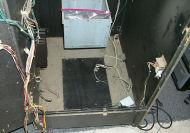 You probably don't even need to look at the full size picture to answer that question! You probably don't even need to look at the full size picture to answer that question!
|
Filthy Power Supply Board
Date 8/13/2006
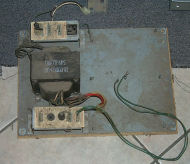 Here you can see the Power Supply Board (the board the Power Supply sits on) and it's a bit filthy. Here you can see the Power Supply Board (the board the Power Supply sits on) and it's a bit filthy.
Time to take it outside and hose it down.
|
Hacked the Wiring Harness
Date 8/13/2006
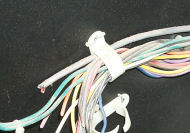 When they converted the game, they hacked up the harness pretty good. Luckily, I have a couple QIX harnesses that will do the job. When they converted the game, they hacked up the harness pretty good. Luckily, I have a couple QIX harnesses that will do the job. It should also be noted that unlike a lot of other games, the Wire Looms were actually Stapled in rather then screwed in. During the re-assembly, I decided to screw in most of them. The ones on the back door, however, will be stapled. The reason I am stapling the ones on the back door is due to the fact that they used Particle board for the back door. The harness is VERY heavy at the back door and it was pulling the screws out of the wood. The staples hold the weight just fine and they don't get pulled out.
|
The Re-Assembly has begun!
Date 8/13/2006
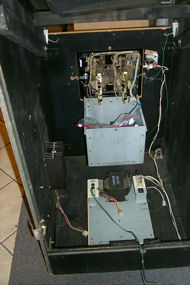 I got the Control Panel filled in and powder coated, the coin door has been powder coated and now it's time to re-assemble Zoo Keeper! I got the Control Panel filled in and powder coated, the coin door has been powder coated and now it's time to re-assemble Zoo Keeper! As you can see, the iside is a lot cleaner now, thanks to some Pledge. The Power Supply Board is nice and clean now thanks to a garden hose and the Arizona Heat.
|
Cleaning up the Control Panel
Date 8/13/2006
 Using the Magic of the "Magic Eraser", I was able to take this control panel and clean it up. Using the Magic of the "Magic Eraser", I was able to take this control panel and clean it up.
I read about people using the "Magic Eraser" and decided to give it a try, and now I'm convinced that it really IS magic!
|
All Clean!
Date 8/13/2006
 It is Magic! If it wasn't for the cracking at the bend, this CPO would look almost new! I am not going to replace the overlay as this one is still too nice. It is Magic! If it wasn't for the cracking at the bend, this CPO would look almost new! I am not going to replace the overlay as this one is still too nice. If you read futher up about the control panel, you might be asking yourself, how this one magically got a Zoo Keeper overlay on it... Well, this is actually the second control panel. I found this one on eBay. The first one, I had a friend attempt to fill in the extra holes by welding plugs in. Unfortunately, that caused the whole panel to warp and I didn't want to apply an overlay to it. So I found another one that wasn't converted and used that.
|
Down Under the Control Panel
Date 8/13/2006
 The underside of the control panel was a bit rusty and dirty. The underside of the control panel was a bit rusty and dirty.
I cleaned off the rust with some CLR (Rust Remover) and a wire brush.
|
Freshly Painted CP
Date 8/13/2006
 After cleaning it up, I hit it with a couple of coats of Gloss Black using a Spray Can. After cleaning it up, I hit it with a couple of coats of Gloss Black using a Spray Can.
I didn't bother sanding the bottom smooth, so there are some bumps, but those will be covered by the joystick.
|
Controls Under the Control Panel
Date 8/13/2006
 The one I got from eBay had some issues with the Wood used on the bottom of the control panel. The one I got from eBay had some issues with the Wood used on the bottom of the control panel.
It had a lot of water damage.
|
New Parts
Date 8/13/2006
 I now have 3 Zoo Keeper control panels, and 2 use wood under the control panel, while the first one that was on the game, used Plastic. I'm not sure how rare the plastic version is, but I like it a lot more then the wood version. I now have 3 Zoo Keeper control panels, and 2 use wood under the control panel, while the first one that was on the game, used Plastic. I'm not sure how rare the plastic version is, but I like it a lot more then the wood version.
I picked up new bolts and new washers. I used the parts from the first control panel to rebuild this one.
I'm waiting on new Buttons, Leaf Switches and Button Holders from Mikes Arcade. Once I have that I will post a picture of the completed control panel.
|
The Control Panel Completely rebuilt
Date 8/13/2006
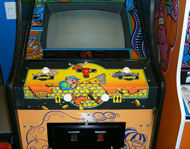 Here you can see the control panel with the 4 brand new buttons I got from Mike's Arcade. Here you can see the control panel with the 4 brand new buttons I got from Mike's Arcade.
The Joystick is the original one that I stripped down, cleaned and rebuilt.
|
New Light Fixture!
Date 8/13/2006
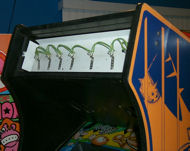 Taito used some odd light fixtures compared to the rest of the manufacturers. This fixture is a series of #47 Lamps like you would find in a coin door. Most manufactures used a florescent light fixture. Taito used some odd light fixtures compared to the rest of the manufacturers. This fixture is a series of #47 Lamps like you would find in a coin door. Most manufactures used a florescent light fixture. After some searching I found an original light fixture on eBay. I don't know how many Taito games used this style of light fixture, but I do know that Jungle King used it. When they converted the Zoo Keeper to a Galdiator, they removed the original fixture and put in a single Incandescent light bulb. What I don't understand, is why they did it. The bulbs run off 6.3V that is already powered by the Isolation Transformer. They wouldn't have had to make any changes at all. Maybe they thought it would melt the Gladiator's plexiglass marquee since the Zoo Keeper one was made from Glass.
|
Marquee
Date 8/13/2006
 Well, the marquee that I have, isn't the greatest. Well, the marquee that I have, isn't the greatest.
It has several scratches and pin holes all over the place. However, it's better then nothing! I'll keep looking for a better one, or a good reproduction.
|
The Base has seen better days....
Date 8/13/2006
 While working on the game in my Arcade I noticed that the bottom of the cabinet was starting to dissinegrate.... not a good thing. While working on the game in my Arcade I noticed that the bottom of the cabinet was starting to dissinegrate.... not a good thing.
|